Creating roof faces
|
Command |
Workspace: Path |
|
Roof Face |
Architect: AEC Landmark: Landmark > Architectural Spotlight: Spotlight > Architectural |
To create a roof face:
Draw the 2D object that is the basis for the roof. Any enclosed 2D object can be used, such as enclosed arcs, polylines, rectangles, circles, and ovals.
With the object selected, select the command.
The Create Roof Face dialog box opens. Specify the roof slope creation method, edge and hole miter options, and roof parameters.
Click to show/hide the parameters.Click to show/hide the parameters.
|
Parameter |
Description |
|
Roof Slope |
Indicates the roof slope creation method and criteria |
|
Angle |
Creates a roof slope based on an angle; specify the Angle |
|
Rise over Run |
Creates a roof slope based on rise over run values; specify the Rise and Run. The rise is the distance along the Y axis the roof rises above the Z height, and run is the distance along the X axis for the roof to reach that height. |
|
2nd Click Height |
Creates a roof slope based on a mouse click position (this option only available in Top/Plan view). Enter the Height for the second mouse click. |
|
Eave Cut |
Indicates the cut type for the lower edge of the roof face |
|
Vertical |
Creates the edge perpendicular to the active layer plane |
|
Horizontal |
Creates the edge parallel to the active layer plane |
|
Double |
Creates the edge with a horizontal and vertical cut; specify the Horizontal and Vertical lengths |
|
Square |
Creates the edge perpendicular to the roof surface, regardless of the roof angle |
|
Hole Cut |
Specifies hole cut options for roof cutouts made with 2D objects (does not apply to holes associated with dormers and skylights) |
|
Vertical |
Cutout edges are perpendicular to the active layer plane |
|
Splayed |
The bottom edge of a cutout is perpendicular to the active layer plane, and the top edge of a cutout of is parallel to the active layer plane |
|
Square |
Cutout edges are perpendicular to the roof surface |
|
Axis Z |
Sets the roof height at the axis |
|
Angle |
For angled roof slopes, indicates the roof slope angle |
|
Rise/Run |
For rise over run roof slopes, specifies the rise and run values |
|
Height |
Indicates the height of the second mouse click when the roof slope is specified with that option |
|
Thickness |
Specifies the roof thickness; when the roof face is styled, this parameter is not available since the components determine the thickness |
|
Vertical/Horizontal |
For double miters, specifies the horizontal and vertical miter lengths |
|
Style |
From the Resource Selector, double-click a roof style to apply it; see Using roof styles. |
|
Convert to Unstyled |
Converts a styled roof face to unstyled |
|
Roof Preferences |
Opens the Roof Preferences dialog box; see Roof preferences |
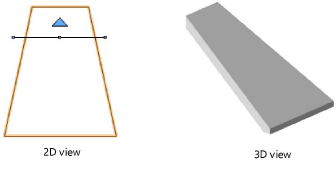
Click-drag the cursor across the 2D object to draw a line that defines the roof axis; click again to complete the line. An arrow displays on one side of the line, indicating which side of the object will be the high side of the roof.
Point the cursor to the side of the roof that will be highest, and then click again. The roof axis line displays selection handles, and the arrow pointing to the high side of the roof turns blue, indicating that the roof face is complete.